So I love, love, love when things turn out exactly how you imagined them!! Now perhaps I love this so much because it seldom happens or perhaps it's because I can believe I am a genius, if for only a minute. Well this dress was one of those things!
Let's set the scene here. I am in JoAnnes fabric with the intention of getting the red, white, and blue tulle needed to make the DD a tutu for her birthday party and 1 year pictures. Well they are having a nice sale so I browse the patriotic fabric and that is where I see it, the perfect little fabric that would make an adorable girls dress. An adorable party dress!
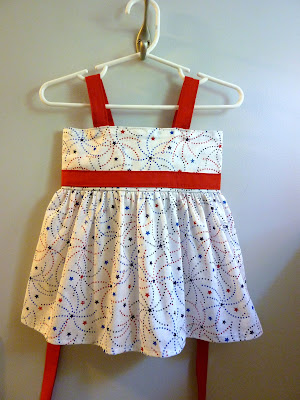
So right there in that very second is when I decided to make a dress and in a matter of moments I had an idea in my head as to how this dress was going to be. Now I will also say I have never made a dress of any kind and it was only 2 weeks until she would need it. If you know me, you know 2 weeks isn't very long for me to get motivated enough and have enough time to finish something. Well I took the fabric and tulle to be cut when the lady asks me what I am doing with it. After hearing it was going to become a dress and I had never made one before she told me to save myself some trouble and go look at the patterns. Now I was thinking that patterns were too complicated and really not my style so I took my chances. I'm secretly grateful that it turned out or else I would look like quite the idiot! So here it is, minus the straps. This is a much better picture than the finished one.
It was actually quite simple and didn't take terribly long. I could have probably finished it in about 3, maybe 4, hours if there were no interruptions though as any Mom would know it doesn't happen.
What I did was just took a rectangle of desired measurements for the top, ironed 1/2 inch down along the long sides and 1/2 inch along the short sides. I tuned another 1/2 inch for the short sides to give a studier place for the snaps and sewed a line about 1/2 inch out and one very close to the edge on the short sides. Add the snaps and your top tube is done.
For the bottom I just figured out the desired length, went down that many inches on the fabric and cut all the way across. I sewed up the short side creating a big tube. I made a hem in the bottom and then ran a basting stitch along the top so I could gather the large bottom tube to be the same diameter and the top part of the dress, also creating some fullness in the dress.
I made the sash and sewed it about 3/4 inches from the bottom of the top part of the dress and then pinned the top and skirt right sides together. Sew with a 1/4 seam allowance and all that's left are the straps. To make it look better and make it easier I made the fold on the top piece of the dress the bottom and left the side where I ironed 1/2 down on the top. Then you can sandwich your straps between the 2 layers, pin in place, then run a stitch close to the edge all the way around your top. This gives everything a nice finished look. If you want to make one of your own I can put together a tutorial, just let me know!
Here is a picture (sorry it's so bad) of the finished dress, I will say it looks so much cuter on the girl! It's still hard for me to believe I made something this cute and it came out just like I planned or didn't plan depending on how you look at it!


No comments:
Post a Comment