Showing posts with label baby. Show all posts

Saturday, April 2, 2011

Some (not so) Recent Projects

Here's a round up of some things I've made here and there for various occasions.  I'm going to really try to get better about posting here which also means that I need to improve my picture taking.  I have a long list of things I would really like to make so hopefully I'll be able to find some time to work on them.

These first 2 things are gifts I made for an expectant mother.  She has since had her baby and really enjoyed both gifts.  The first was a blanket and the second was a diaper pouch.  Though this is her second child she did not have a diaper pouch and was very excited about it.


These next couple are the Valentines I made for my sons school and the Valentine gift I made for the DH and my parents.  I know your probably wondering why I'm bothering to post these since it's quite late but the Valentine I made for his teachers could be used any time and what I made for the DH and my parents could easily be altered for an easy birthday gift, thank you, or just because!

The valentines for the kids.

 These are what I made for both of his teachers.  That's the lotion hand sanitizer in between and I will say they were very happy with this!  Would be a great little teacher appreciation gift, or beginning/end of school gift.


 And finally this is the cookie bouquet I made.  It seemed like it should be simple but turned into quite the project that almost didn't get finished in time!  I bought plain terra cotta pots and had my son paint them.  I filled them with floral foam (styrofoam, gravel, sand will work too) and tied a ribbon around it.  I made and decorated some cookies and rice crispy pops.  The rice crispy treats were very easy but one little tidbit I learned is that you should make them a day ahead so they have time to firm up.  The ones in the DH's bouquet fell off the stick but the one's on my parents were fine (they were delivered next day).  This was very easy minus the cooking faux pas we had and makes a great anytime gift!


I really am getting the sewing bug again, and hopefully some time to fulfill it, so more posts to come soon!

Tuesday, July 27, 2010

Tuesdays Tut

Sippy Cup Leash


So I am sure everyone has seen these in the stores selling for the astronomical price of $5.99!!!  Really there is no way it's worth 6 bucks but apparently people buy them.  Well it is so easy to make one and takes less that an hour of time and 4 inches of fabric.

Now I have seen a couple tutorials on these however I wanted to make one that was adjustable for different cups.  I devised a very easy way to accomplish this.


Materials:
scrap of material/s  (one the entire width of fabric, two if shorter or if you want a different look)
velcro
scissors
plastic ring (small 1/2 inch)
sewing machine and thread


Directions:
Cut 3 strips of fabric.
  • First: 4 inches by 22.5 inches     (4" x 22.5")
  • Second:  3.5 inches by 12.5 inches     (3.5" x 12.5")
  • Third:  3 inches by 4 inches     (3" x 4")


Iron the short ends down about 1/4 of an inch.


Iron the pieces in half length wise.  Open up the fold and then iron each side to meet at the center line.  Sorry if I am not describing this very well, I'm not sure exactly how to explain it.  You are essentially making a binding.  When finished these 2 steps fold back in half and run your iron over it again to make sure it lines up nice.  Your strap will now be 1/4 of it's original width; your 4 inch piece will now be 1 inch wide.


Take your longest strap and sew up one long end, across the top and down the other side very close to the edge.  Leave the bottom edge unsewn so that you can tuck your other pieces inside.

Now take your medium length strap and do the same thing as the first, the two sides and top.

For the short strap you can either just sew the long sides or you can sew all the way around.  The 2 short ends will be tucked in anyway making a loop for your plastic ring.

Now it's time to sew on the velcro to your two longest pieces.  Take the longest piece (your strap) and sew a 1 inch piece of  velcro at the top end and the other piece(about 2 inches long) ~ 5.75 inches down from the top of your strap.  These 2 pieces will be on the same side. **Due to the differences in strollers you should measure how big you need your loop to be, this will probably fit most but may not fit all.  You could also put this loop around the buckles on the seat too.**


Your medium piece (the cup strap) you will sew a piece of velcro at the top and another longer piece ~ 5.5 inches down from the top.  **Again this should be fine for most cups but you want to check and make sure it fits yours.  These will also be on the same side of the strap.  I originally did them on opposite sides but found the strap comes undone more easily.

**A little tip on sewing on velcro.  When sewing velcro sew one stitch past the velcro then come back to one stitch before the edge (2 stitches basically coming back in line to sew the next side) before turning to do the next edge.  This will help tack down the corners of the velcro so they don't catch on something and pull up.**

Time for assembly.  Take the short piece, place a plastic ring on it and fold in half to make a loop.  Baste in place.  Take the cup strap and place your loop on top of it.  Now take both of these and tuck into the bottom of the main strap.


You will be making a little sandwich and it should look like this (or close).  All thats left is to sew the bottom closed, sewing the other pieces in place.  I would sew over this 2 or 3 times just to be sure it's secure!

The final step is to sew a line just below the ring to sew the loop to the sippy cup strap.  You can cut out this step if you readjust where you put your velcro, they will have to be closer together.

ENJOY!!  You never have to worry about losing cups again.  If you have a child like me who lives to throw things out of the stroller this will be a blessing!

Thursday, July 1, 2010

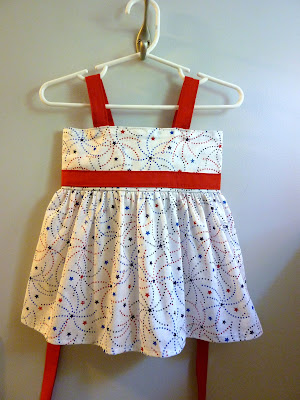
Patriotic Party Dress!

So I love, love, love when things turn out exactly how you imagined them!!  Now perhaps I love this so much because it seldom happens or perhaps it's because I can believe I am a genius, if for only a minute.  Well this dress was one of those things!

Let's set the scene here.  I am in JoAnnes fabric with the intention of getting the red, white, and blue tulle needed to make the DD a tutu for her birthday party and 1 year pictures.  Well they are having a nice sale so I browse the patriotic fabric and that is where I see it, the perfect little fabric that would make an adorable girls dress.  An adorable party dress!


So right there in that very second is when I decided to make a dress and in a matter of moments I had an idea in my head as to how this dress was going to be.  Now I will also say I have never made a dress of any kind and it was only 2 weeks until she would need it.  If you know me, you know 2 weeks isn't very long for me to get motivated enough and have enough time to finish something.  Well I took the fabric and tulle to be cut when the lady asks me what I am doing with it.  After hearing it was going to become a dress and I had never made one before she told me to save myself some trouble and go look at the patterns.  Now I was thinking that patterns were too complicated and really not my style so I took my chances.  I'm secretly grateful that it turned out or else I would look like quite the idiot!  So here it is, minus the straps.  This is a much better picture than the finished one.


It was actually quite simple and didn't take terribly long.  I could have probably finished it in about 3, maybe 4, hours if there were no interruptions though as any Mom would know it doesn't happen.

What I did was just took a rectangle of desired measurements for the top, ironed 1/2 inch down along the long sides and 1/2 inch along the short sides.  I tuned another 1/2 inch for the short sides to give a studier place for the snaps and sewed a line about 1/2 inch out and one very close to the edge on the short sides.  Add the snaps and your top tube is done.

For the bottom I just figured out the desired length, went down that many inches on the fabric and cut all the way across.  I sewed up the short side creating a big tube.  I made a hem in the bottom and then ran a basting stitch along the top so I could gather the large bottom tube to be the same diameter and the top part of the dress, also creating some fullness in the dress.

I made the sash and sewed it about 3/4 inches from the bottom of the top part of the dress and then pinned the top and skirt right sides together.  Sew with a 1/4 seam allowance and all that's left are the straps.  To make it look better and make it easier I made the fold on the top piece of the dress the bottom and left the side where I ironed 1/2 down on the top.  Then you can sandwich your straps between the 2 layers, pin in place, then run a stitch close to the edge all the way around your top.  This gives everything a nice finished look.  If you want to make one of your own I can put together a tutorial, just let me know!

Here is a picture (sorry it's so bad) of the finished dress, I will say it looks so much cuter on the girl!  It's still hard for me to believe I made something this cute and it came out just like I planned or didn't plan depending on how you look at it!

Thursday, May 6, 2010

Tye Dye Sneak Peek!!


This post will be a lengthy one so for now a little peek....

Friday, April 16, 2010

T-Shirt to Cropped Pant (or shorts or long pants) Tutorial

So I have a VERY easy little project to share with you!!  I am all about re-purposing and this project is perfect for using up those old t-shirts that have been retired from your collection.  Of course you could always use cheap new t-shirts found on clearance or found at a yard sale or thrift store.

I found a 3 pack of boys shirts marked down to $5 so I snagged them up and brainstormed what to do with them.  A friend of mine's little girl had a birthday approaching so I decided to make some cropped yoga pants.

This method could easily be used to make shorts or long pants as well!  Just make sure your shirt is long enough if your making pants.  The shirts I used were a boys large which was perfect to make them hit below the knee in a size 3/4T.

I am not real familiar with making tutorials but it's pretty easy to follow.

Materials:

newpaper
favorite pants
pen/pencil
scissors
t-shirt
elastic
thread

First you will take some newspaper and lay your favorite pair of pants on top to make a pattern.  A few things to keep in mind while making your pattern.  Fold your pants in half and line up the straight side with the edge of the newspaper.
  • Make sure you remember to add seam allowances so the pants will fit once sewn.  No need to measure here, just trace roughly 1/4 inch from the outline of your pants.
  • Add about 1.75 to 2 inches to the top of your pants to make room for the elastic casing.
  • At the very top (at the waistband) don't trace exactly at the edge, make a bit wider than the waist on the pants so there is extra fabric when the elastic stretches while putting on.
  • Slide the pants down the newspaper until they are the length you want.  For shorts above the knee, cropped yoga below the knee and pants all the way.
  • Measure your child's waist and add 1/2 inch.  This will be how long to cut your elastic.  For example if your child's waist is 20 inches then you would cut your elastic 20.5 inches long.
Sorry I didn't take a picture of this step, I can and post it if anyone is confused.

Next you are going to line up your pattern on the edge of your t-shirt as shown.  Line up the straight edge with the edge of the shirt and the bottom with the bottom of the shirt.  This will give you an already hemmed and finished bottom edge...with NO WORK!  You want to make sure the top of your pattern comes no higher than the bottom of the armpit.  If it comes higher you need a longer shirt or could always make shorter bottoms.

Here is a close up...

Once you cut out one side repeat on the other side so you have 2 identical pieces, they will look like this...

And here is a picture showing you where the pattern was on the shirt and the resulting pieces.  Sorry if this is redundant I just wanted to make sure people understand what I mean.

Next you will open up your two pieces and put them right sides together, lining them up as best as possible.  Due to the nature of this projects and of t-shirts they may not line up exactly but that is fine.  Try to line up the bottoms as close as possible and any subtle differences can be fixed in the waistband.

Now as you know the finished edge will be the bottom of you pants.  You are going to sew the crotch first.  This is the top half of the pants, sew on either side.

Next you will twist them around so they look like inside out pants.  The crotch seams will now be down the middle just like on real pants.

Now you will sew the inseam of the pants.  You can do this one of two ways: sew up one side then sew up the other or start on one side, sew up one leg then down the other.  I do the latter but it doesn't really matter.  I also sew a zig-zag stitch on the edge when I'm finished although you don't have too.  T-shirt material is great because it doesn't fray!  The first pair of pants I made for my son I didn't finish any edges nor did I make a formal casing for the elastic.  Many wearings and washings later and they are still going strong!  If you don't want to go through the hassle of ironing and sewing a real casing for the elastic, don't!  Just fold over wide enough for your elastic to fit and sew.

Your final step is to make the casing for your elastic (or not).  Making a casing is easy, start by folding over 1/2 inch and ironing.  Next turn down 5/8 to 3/4 inches and iron again.  Pin in place if necessary.
Finally sew around the bottom edge, as close as possible.  Leave about an inch space so you can thread your elastic through.  Sew the ends of your elastic together then sew your opening shut.

Flip them right side out and ENJOY!!

Saturday, February 27, 2010

Easiest Project EVER!


Quite literally the easiest project I have done, at least recently!  These are a pair of leg warmers made using Alexis' awesome tutorial Little Leg Warmers in 6 Easy Steps.  She cracked to code on how to make these for a fraction of the cost of buying Baby Legs which are sold for $12 a pair!  OUCH!  You can buy much cheaper ones from Etsy but why bother when they are this easy to make.

As you know we are  BIG fans of leg warmers in this house, both kids have worn them on many occasions.  From now on I am keeping an eye out for clearance knee highs so I can make more.  I think it took me 20 mins total.  That included gathering the materials, cutting, folding pinning, changing the thread on the sewing machine, sewing, finishing and flipping.  Even someone who doesn't sew could make these.

A BIG thank you to Alexis for putting together this wonderful tutorial!!

Friday, November 20, 2009

Finally Some Crafting!

So I have finally been able to dabble in a bit of crafting lately. About a month ago I spent a few days cutting the fabric for about 10 projects but thats as far as I got. Now that birthdays and football are coming to an end I am getting back into my projects. Good thing because I do have a handful of handmade presents I would love to make. This won't be anything like last years handmade Christmas but I would still like to make some things.


First on the agenda though was a winter hat for my daughter now thats it's starting to get cold. We haven't pulled out the snowsuit yet since I put a blanket on her while she's in the carseat or stroller but her head is still exposed and gets pretty chilly (she's an ice cube baby). I knit this in Alpaca yarn in a beautiful shade of purple although it's hard to see here. Basic 2x2 rib done big enough, I hope, to fit all winter!

Yesterday I managed to make 2 of the small sewing projects I had. This was a taggie blanket made for my daughter. I also used a few fabrics with different textures (fleece, flannel, corduroy, polka dot minky) to add to sensory aspect of it. I only did the ribbon on one side because she loves to rub burp cloths against her face so I wanted some to be smooth for that purpose. I thought this would come together real quick but ended up taking 2 hours. It's worth it though because it turns out she LOVES it!! I think I will be making a couple more for her since she likes them.

The other thing I made were a set of seat belt covers for my son. His old pair were getting quite worn and they have since marked the price up from $2.99 to $6.99!! Yeah totally not paying 6 or 7 bucks for them. I traced the set I had to make these and they are perfect. While I would have not picked this fabric for such a small project he did and he likes them so that's all that matters. I have another set for my daughter all cut out but I ran out of velcro.

Saturday, May 16, 2009

Some Gifts for a Baby and a Tote Bag

These are a few of my most recent projects. I have taken a break from making quilts since very soon I am going to be sewing my little girls comforter for her room. Instead I have been doing a bunch of small quick projects.


The first was a little set I made for my SIL's baby boy. He is due to arrive in a few weeks and I made these using some of the leftover fabric from the baby blanket I made her already. I appliqued the onesies with squares cut out from the flannel and I made a taggy blanket to match everything. I have heard babies love these so hopefully he will too. The shoes were a pair from the remaining 3 I finished last week.


The other thing I made Thursday night was a tote bag for my friends birthday. She was the one I was knitting the mittens for but I have admitted defeat. I have one finished but am just not into knitting right now (which stinks because I have a bunch of projects I wanted to do before my little girl arrives). I think this may be a combo of the fact it takes me forever and also it is not comfortable for me to sit still for very long which is almost required for knitting (at least me). Since I don't think I can justify to my husband why I paid someone to knit my projects for me I think I may just have to deal with the fact they won't get done.

Anyway with all that being said I needed to come up with something else for her birthday and I will be seeing her on Wednesday so I wanted to have it by then. She loves bags, really what girl doesn't, so I am hoping she will get some use out of this small tote bag. It was super easy and came together pretty quick and now I am just thinking of how to fill it! I think I will be making LOTS of these especially considering how quick and easy they are to make.

Sunday, May 10, 2009

What To Do With A T-Shirt?

So.... What do you do with an old t-shirt?

Well yesterday I tried out a few answers to that question. I actually purchased a few shirts at Goodwill since we don't have any ready to retire quite yet. First up... a newborn gown.

I found the tutorial and patterns over at This Mama Makes Stuff, click here to go right to the pattern. I came across this in my web browsing the other day and thought they were too cute to pass up. Now having never sewn a piece of clothing I was a bit intimidated. I have had new found confidence with sewing lately after my appliques and the baby doll diapers I made. Since the shirt cost me $1.50 I figured I really have nothing to lose, it seemed pretty uncomplicated.

Turns out it wasn't very difficult at all. It was time consuming for me probably because I haven't sewn much other than straight lines and this had hems and zig-zag stitch and elastic. I did make a few modifications to the sleeves, I made it about 3/4 length sleeves and made them smaller. They were quite wide the first time I sewed them. It is far from perfect, I need a little more practice with the zig-zag and also the underarms gathered a bit and I can't figure out why. Inside out they are flat but when I flip it the kinda bunch, more practice and I will probably figure that out too.

All in all I am shocked and quite proud of myself that I MADE THIS!! My little girl will definitely be getting lots of use out of it and it was easy enough I may make more. And I must say it came out quite well!! Check it out below.


After having much success with this I went on to my next task, making pants for my son with an adult t-shirt. Basically I did this by taking a pair of his pants that fit well and folding them in half. Then I traced around the pants lining the outside of the leg on the edge of the paper. This is where your fold would be. I drew another line allowing for a 1/4" seam allowance and then cut out. Anyway I don't feel like going into every detail here, nor did I take any pictures of the process but if you would like a great tutorial on this click HERE.

I can't believe how easy these were to make. I am certainly going to make many more pairs of these for both my son and daughter and perhaps some for gifts as well. I will also keep my eye open at the fabric store because you could make these using any fabric. Not to mention the fact you can make shorts just as easily by just making them shorter!


Last I just wanted to post a picture of the baby doll diapers I made. These were super simple and I ended up making 4 of them so we should be set for a while!

Thursday, May 7, 2009

Baby Shoes

Just wanted to post a quick picture of the 3 pairs of baby shoes I have already done. Only the ones in the middle are reversible. The other 2 pairs just have plain black inside so I took the easy way out and just sewed the sole on. I think my favorite pair are the leopard print ones which just happen to be for my baby girl!

Tuesday, April 28, 2009

Busy, Busy

So I have been quite busy this past week. Since I know I will not have much time after my daughter arrives to craft I am trying to kick my butt into high gear to complete as many projects as I can before she comes.

The first thing I worked on were some fabric animals that I am going to applique on to the 4 plain black squares which will be on the jungle quilt. I also have bought the black fabric and plan to cut those pieces today, then I can put together the rest of the quilt. I LOVE these animals and think they are very adorable. They were quite simple too so watch out because everything may be getting embellished soon, at least the plain stuff! They should look really cute on the quilt too because these are all animals on the fabric.


The other thing I worked on were some fabric shoes. They are made to fit a newborn but could easily be enlarged for other sizes. I decided to make these for a friend of mine who is due in June. I also figure I will make some for my daughter and also my SIL is due in June so there's no shortage of babies. That's not even counting the newly pregnant women I know! I found the pattern and directions here. They are a bit tricky at parts but overall generally easy. I was doing these assembly line style and currently have 6 pairs halfway done!

Best part is they are reversible so you have 2 pairs for the price of one!


The final thing I just started yesterday is a pair of mittens I plan on making for a friend of mine for her birthday the end of May. I am hoping I stay motivated enough to finish these and that I don't get stuck on any of the steps since it's my first attempt. These are being made with yarn that matches a hat I had previously made her. This is all I have completed so far so I have a long way to go.

Thursday, March 26, 2009

Baby Blanket

This is a blanket I put together quickly for my pregnant SIL. She is having a boy and I had a tough time finding fabric that I loved in the flannel. They live in Florida so fleece would have been too hot so I wanted flannel and the fact that it was on sale for half off was also a motivator. Well finally at the end of the row I saw this ADORABLE pattern. They also happened to have there soft, plush fabric on sale for half off and they had this vivid green that was perfect. I knew I wouldn't have time to make a true "quilt", even a simple one since I only had a handful of days before we were leaving so I just cut 2 squares the same size, sewed them together right sides facing out, and then sewed a satin quilt edging around it. The edging is actually almost the exact shade of the back but I guess since it's shiny the color didn't photograph well. Came out well and was SUPER CUTE. Best part is I got it finished in time to take with us down there. My son was a bit attached to the fabric so there may be one in a larger size in his future but we shall see.

Friday, February 27, 2009

On the Needles


So on the needles I currently have started knitting Lion Brands Comfy Kimono
for my baby girl. I am knitting it in the same color as the picture too, it's such a gorgeous color. It is made using Lion Brands Micro Spun and size 8 needles. I am really liking this yarn, it's very soft kinda silky feeling and very easy to knit with. I always knew I was a tight knitter but I have found that to be greatly true with this pattern. The patterns gauge is 18 stitches across making 4 inches, well MY gauge is 22 stitches for 4 inches. I knew I knit tight so I made the next biggest size but the back is still an inch smaller than the size I was shooting for called for. That worried me at first but I measured one of her 6 month old tops just for comparison and it was 9 inches wide, the same as the kimono back, so I am thinking I should be fine, probably fit around 3 months or so. Anyway I digress a bit but I wasn't going to go up to size 9 needles with this yarn to get the correct gauge because then the stitches would have been very loose and I wouldn't have liked that either. Who knows it may fit her right away which is fine too as long as it fits her at some point I consider it a success!

I am also on the quest to find size 7 16" circular needles. Not an unusual size, I didn't anticipate any trouble finding them but it turns out they apparently don't exist in my area. I really don't want to go to my LYS to buy them because I know I will be paying more for them. I save my LYS to splurge on fabulous yarn, not needles. Anyway tomorrow I am checking one more place that is near my parents house, I am praying they have them because I have a coupon. If I don't find them there then it will be time to do some online shopping.

Didn't know it until after I bought the yarn and went to start one of the 4 hat patterns I have printed out and onmy list to do that every single one of them uses size 7 needles!! I couldn't believe they all used size 7, they were worsted weight yarn so I assumed size 8 but I was wrong. I wouldn't have imagined every one of them using size 7. Now I do have size 7 DPN's but I like circular needles soooo much better so I don't even want to knit the hat using only the DPN's eventhough I already have them. Call me crazy but instead I am on mission impossible because I'm stubborn! Well enough ranting I just needed to say a few words about that, apparently my town prefers 36 inch circular's because I could find those in every size but there are only about 3 or 4 different sizes of 16 inch. Who'da thought?

Wednesday, February 25, 2009

Pictures of Hats

So here are the pictures as promised. The first one is my first knit for my baby girl who will be debuting in early summer. This was actually the pattern on the skein of yarn and as you can see it's adorable. It will be perfect for summer, especially since it's baby weight yarn so it's nice and light. I may end up knitting one without the eyelets for summer use so she won't have a spotted head and perhaps a few more in various sizes because they are quick and super cute.

This next one was one I knit in a day using a small amount of leftover yarn. Turns out I loved the ruffle so much, and it's so easy to do, that I just knit a basic hat and added a ruffle. No pattern needed. I didn't write it down and am not sure how I did it but the decreases turned out in such a way that the hat looks like a flower. It even ends in a slight point. I knit this initially for a fellow Mommy to match the shrug I had knit but it will depend on when I see her next and if the hat will still for her little girl. If it's a bit before I see her it will be used for my baby girl. Good thing is it won't go to waste!

This is a view looking down from above so you can see the decreases. Again, really wish I would have wrote this down because it looks so much like a flower!

The only other news is I finished knitting the birthday present last night and I sat down yesterday and "designed" the quilts I need to make. Nothing fancy, basically just serves as a blueprint so I know how to sew it together and how many squares of what color and size I need to cut.

I also have begun a quest searching for pink and brown fabrics to see if I can find one I absolutely LOVE. If so then I may just make the crib set myself, or at least the comforter and curtains. A plain crib bumper is easy enough to find.

LinkWithin

Related Posts with Thumbnails