Showing posts with label tutorial. Show all posts

Tuesday, July 12, 2011

Beach Comber Bag Tutorial

As promised here is the tutorial for the quick and easy beach comber bags!!  Experienced sewers can probably whip one of these out in under 30 minutes.  Don't worry beginners, this is a perfect project for you too!  I would say an hour at most to make one.  Could also be a great stash busting project for those bigger pieces or a pieced one would be super cute as well, the possibilities really are endless!  Don't be intimidated by all the pictures, hopefully it will make it easier since some steps may sound complicated.


Materials:

1/3 yard of fabric
interfacing (heavy or craft weight) - only need a 4"x 20.5" piece
1/3 yard of mesh fabric (found in the utility fabric section)
thread
scissors

Instructions:

First you are going to cut out your fabric.  You will cut:
     Interfacing - 4" x 20.5"
     Band fabric - 6" x 21" and a 4" x 26" piece if using same fabric for a strap
     Mesh fabric - 12.5" x 20"


2)  Iron your interfacing onto the 6" x 21" piece of fabric.  Make the interfacing 1" from the top and bottom and 1/4" from each side (as shown in the photo above).  Now you will iron down the top inch and the bottom inch on this rectangle.


After ironing that then iron it in half, lining up both edges that you just ironed down.


Now if you are making your own strap then take the 4" x 26" piece of fabric and iron it in half.  Open it back up and then iron each edge up to the center crease you just made.


Once you have done that then fold the fabric back in half and press once more.  You've now created a strap.  For this you could also use cotton webbing to make an even easier strap!  That's what I used for the nautical one I made.


Now it's time to get sewing!  First top stitch down each side of your strap like so


Next you are going to open up your band piece and line up the edges, right sides together.  Sew down one side to make a tube.  After you've sewn down one side then fold up the bottom inch on either side like shown below.


 Take you mesh piece of fabric and fold in half so that the 12.5" sides make up the sides of your bag (lay it down lengthwise and fold in half that way), you will have a 12.5" tall by 10" wide rectangle.  Sew across one 10" side and up the 12.5" side.  Leave the 3rd side open, this will be the top of your bag.  The mesh is just slightly narrower than the band because it stretches easily.


 Now your ready to start piecing this together.  The first thing you want to do is fold your band tube in half with the seam being one half.  Mark the other side of this so you know where to put your strap.


 Take your strap, center it on the seam and the other mark you made and baste in place.  Position it so it makes a U hanging down from the band.  Line the end of the strap up with the top of the ironed inch.  There is a good picture of this below.  This is why I took so many pictures because this step sounds confusing but if you see how the strap is positioned it's a piece of cake!


This is how you want to line up your strap!


 After the strap is basted in place you are going to make a little sandwich with your band and mesh fabric.  Line up the side seams on both pieces and then pin your mesh fabric so it's just below the center crease on the band.  The strap should be INSIDE the mesh pouch.


 Once it's all pinned in place sew around the entire perimeter just below the center crease.  This just hold everything in place making it very easy to do the final seaming.  Once sewn you are going to flip the entire thing inside out so that the mesh is right side out and the handle is on the outside like shown below.


 Don't lose me now, we're almost done!  Fold the band piece back in half and match up the two edges.  Pin in place.  This time you are going to sew all the way around the BOTTOM.  This sews the band together with the mesh in between.  Also before you get to the handle pull the handle like it would be when holding the bag, sew it in place in an upward direction.


 To finish it up and make it look pretty I sewed around the perimeter of the top again, going right over my previous stitches.  Again when I got to the handle I held it in place upwards and sewed it.  There is a close up of the handle with the stitches below so take a peek if your confused.

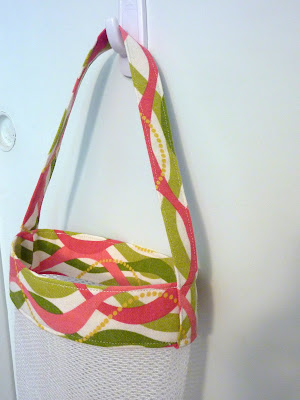
Here is the finished bag!  So CUTE!!  Great for those beach babes or even summer birthdays.  I may even have to make one for myself since I love picking up shells just as much as the kids!  If you don't have a beach this would also make a great explorer bag for your little nature lover.  If you make one I'd LOVE to see it!!


Close up of the handle detail.

Monday, February 28, 2011

Nook Cover 3 Ways!

So this was the project that just kept going, and going, and going!  It should have been simple and quick but ended up being drawn out over almost a week.  Turned out the third time was the charm!  I learned many things through my trials and I'll share with you what I discovered so you don't make the same mistakes I did.

Here is a little tutorial for you on making a Nook cover.  You can really use these as a guide to make a cover for any eReader and, for that matter, any sort of case/cover/etc.  I will put out there that this is a very general guide, I'm guessing most people have some sewing experience, if you have any questions or need clarification please ask!  Also I just noticed I took no pictures of the steps (I really thought I did!) so I'm putting in some pictures from a diaper pouch I made to demonstrate since I used the same technique.  Sorry about the flip-flopping.


Here's what you'll need:

scraps of fabric for outer - rectangles will be 12.75" x 6.5" and 9.25" x 6.5" respectively (or 1/2 yard of fabric - if there's no direction to the pattern you can do it with 1/4 yard)
scraps of yard for inner (or you can use the same fabric, if you aren't using scraps you'll have plenty)
fusible fleece  **optional**
velcro - 2" long


Instructions:

1.)  Cut out your pieces.  
      Cut two 12 3/4" x 6 1/2" rectangles, one for the outer and one for the lining.  This is the back piece.
      Cut two 9 1/4" x 6 1/2" rectangles, again one for the outer and one for the lining.  This is the front piece.
      *If you are using a different lining fabric make sure to cut fabric accordingly.*
      Also if you are using fusible fleece cut one 12 1/4" x 6" and one 8 3/4" x 6" rectangle.

2.)  I wanted to use fusible fleece to give the cover an extra bit of protection and make it a bit sturdier.  You don't need this so it's more personal preference and what purpose you want the cover to have.  If you are using it now is the time to iron it on.  Center it in the fabric, it should be about 1/4" away from the edges.  I did this so there wouldn't be so much bulk in the seams once sewn.

3.)  To give the flap it's shape I marked down 2" from the top, on each side, of the longer piece (the back piece) and 1.5" over from each edge.  I then took a ruler and connected the dots and drew a line.  Cut on that line and you've created your flap.  You could also round the edges or scallop, really let those creative juices run wild!


4.) Now you are ready to start sewing!  Place your outer fabric and lining fabric right sides together and sew up one side, across the top, and down the other side.  You will not be sewing the bottom.  Do this for both the front and back.


5.)  Clip the top corners and flip right side out.  Press seams.  Now you will top stitch across the top edge of the front piece (the shorter piece) and also around the flap on the back piece (longer piece).

6.)  Time to sew your velcro.  Take the hook piece of the velcro and center it 1.5" down from the top on the RIGHT SIDE of you front piece (shorter piece).  Sew in place.


Next you'll sew the loop piece onto your flap.  Center it and sew it 1/2" down from the top on the WRONG side of your back piece (longer piece).

7.)  Take your two pieces right sides together and line up the bottoms.  Sew across the bottom opening then zig-zag or serge the edge.


8.)  Now you will open your pieces, iron your seam to one side and flip your pieces the other way so now the right sides are facing out.  Almost done...promise!


9.)  The only thing left to do is to sew up the 2 sides and enjoy your stylish new cover!  Now you could use plain fabric and embellish with ruffles, applique or whatever your heart desires.  The possibilities really are endless.  I will say though that I was originally going to use a button closure but I was scared that the button may get pushed against the eReader while in a bag and hurt the screen.  For that reason I chose to go button free, I really don't want to crack the screen!

Now here are the other 2 versions I made and I'll give you the little tidbits I learned below each one.  The one below is the first one I made.


I love the fabric with this one and don't mind it being horizontal either (turned out that way simply because of the dimension of the scraps I had).  What bothered me was the flap and how it didn't lay completely flat!  I should have beveled the edges or used 2 pieces of velcro instead of one.  Lesson learned!


This one here is the second one I made.  I had originally wanted a zipper one but didn't have any zippers so I make the zebra one instead.  I wanted it in time for a trip to Vegas and we were leaving in 4 days.  I made it to the store and picked up a zipper to try again since the flap bothered me.  I used the basic guide of this tutorial to figure out how to make the zippered version.  This is the one I really struggled with.  Here is what I learned.
  • I did not take the zipper into consideration when cutting out these fabrics.  You need to make your pieces 1/2" - 1" wider than if you weren't using a zipper.  I learned that one the hard way!
  • If your using interfacing or fusible fleece you need to iron it onto the OUTER fabric.  I ironed mine to the lining and then it wrinkled all funny when I flipped them.  It did not lay well at all.
  • The corners of your project where your zippers are will be a little weird, it's natural so just push them out as much as you can.
  • When you sew everything together make sure your zipper is completely folded in half and the teeth are facing your lining.  For this part I would recommend pinning just to make sure it stays in place, this coming from a girl who forfeits pinning every chance I get!
  • Also make sure you open your zipper halfway before you sew everything together!!  Very important and don't forget or you won't get it flipped right side out.
Like I said I learned a lot from making all these and especially when working with a zipper.  This was my first go at a zippered pouch (with lining) so hopefully with some more practice I'll perfect the skill!  I'm still thinking about making another zippered version, maybe in a plain or manlier fabric for when my husband has the Nook in his possession.  After all it is his!

Tuesday, September 14, 2010

Reusable Snack Bag Tutorial


So with 2 fat quarters and a bit of time you can make 6 small reusable snack bags!  I wouldn't recommend this size for a male user, I'd make them a bit wider, but for kids and even women it's perfect.

Materials:

2 fat quarters
thread
ruler
scissors/ rotary cutter
chalk (or something to mark with)
velcro - just the normal cheap kind is plenty
** lightweight fuseable interfacing (optional)

Directions:

1)  Square up your fat quarters, place them on top of each other wrong sides together and straighten the edges.

2)  Cut the longer sides of your fabric in half.  This will be the 22'ish inch side and this will make each new rectangle about 10-11 inches long.  If you laid the fabric so that the longer sides were perpendicular to you then you would cut up the middle (again perpendicular). 

3)  Next you will divide the shorter side (18 inch) into thirds and cut.  The cuts will be about 5.5-6 inches apart.  I thought I took a picture of the cut fabric but it seems to have vanished...sorry!
Your resulting rectangles will be about 6" by 11" (or close, mine were 10.5 by 5.5) and you will have 6 of them.

4)  Now you will sew around each of the rectangles, right sides together.  Be sure to leave an opening to turn them, you only need about 2 inches or so.


5)  This step is completely optional but I wanted to add some interfacing to give it some stability where you will be opening it.  I happened to have some leftover anyway.  I did this 2 different ways since I started to run out and both work just fine.  I cut the interfacing to the dimensions inside the seam.  I didn't want to add any bulk to the edges when I turned it.

The first 3 had an entire side of interfacing:

The second 3 only had interfacing along the top and bottom (the short sides).

Like I said they both worked fine and again this step is optional since they would work without it too.  I thought they may hold up better with more stability.

6)  Clip your corners and turn the fabrics right side out.  Use something with a point to get your corners, my go to is a knitting needle!  Now turn under the edges at your opening and press your seams.

7)  Take all your pressed pieces and some chalk and mark a line down 1/4 inch.  This will be the where your velcro will go.  You do not want your velcro all the way at the top edge or it will be very difficult to open!


Take your velcro, line it up with the line and sew down the two long sides.  I cut my velcro a hair shorter than the fabric so you couldn't see it once it was finished.


Do that to both ends of the fabric.

8)  All that's left to do is fold the fabric in half, lining up the velcro, to make a pouch.  Topstitch down each side and voila!

*Now one thing I did realize was that since I left my opening at the top I had to topstitch along the top, above the velcro, to secure the opening.  You may need to do that too or you could simply leave your opening on one of the long sides and it would be stitched closed on the last step when you actually sew your pouch.*


These open just like a Ziplock baggie and they come open very easily since you have a bit of fabric at the top to grab on to.  Perfect for all the dry snacks your little ones love!  When they get nasty simply throw them in the wash.  Obviously I wouldn't put anything wet into them but things like carrot sticks should be fine too.


Tuesday, September 7, 2010

Reusable Produce Bags


So I have been using reusable grocery bags for a while now and lately have gotten very good about remembering to use them!  Despite this fact I would just use the plastic produce bags without thinking twice.  That is until I saw Alexis' post here about how she made some reusable produce bags.

I guess it have never occurred to me that reusable ones existed.  I probably just never put the two points together, whatever the reason I had a bit of an "aha" moment.  All of a sudden I had to have them!  She was nice enough to send me a set and I instantly fell in love.  Big thanks to Alexis for sending me a pair and for showing us all how easy they are to make!

I recently went to JoAnnes and bought some purple and blue netting to make myself some more since 2 don't always cut it.  Finally last week I sewed them and today I make the drawstring. 

I know have 4 blue ones to add to the 2 I already was using.  Want to make some of your own?  Head over to Full of Knit to get the simple instructions!

Tuesday, August 3, 2010

Tuesdays Featured Tut

So I've had this bookmarked for at least a year now but have been a bit apprehensive to try it.  I have finally decided to take the plunge and make one!  Perhaps it's my new found sewing confidence I stumbled upon after the success of the party dress.  I saw some fabric on clearance with an extra 50% off (can't beat that) and bought more than enough.  Once I am reunited with my sewing machine this will be first in line.


It's called the Eddie Cap and I stumbled upon this tutorial over at Mushroom Villagers.  Although fearful at first I am very excited to make this little cap for my boy.  If it turns out I think I'll make one for myself since my head is so small I can never find cute hats to wear anyway!  Who knows perhaps little Emma will even end up with one, that is once I train her to keep hats ON!!

Tuesday, July 27, 2010

Tuesdays Tut

Sippy Cup Leash


So I am sure everyone has seen these in the stores selling for the astronomical price of $5.99!!!  Really there is no way it's worth 6 bucks but apparently people buy them.  Well it is so easy to make one and takes less that an hour of time and 4 inches of fabric.

Now I have seen a couple tutorials on these however I wanted to make one that was adjustable for different cups.  I devised a very easy way to accomplish this.


Materials:
scrap of material/s  (one the entire width of fabric, two if shorter or if you want a different look)
velcro
scissors
plastic ring (small 1/2 inch)
sewing machine and thread


Directions:
Cut 3 strips of fabric.
  • First: 4 inches by 22.5 inches     (4" x 22.5")
  • Second:  3.5 inches by 12.5 inches     (3.5" x 12.5")
  • Third:  3 inches by 4 inches     (3" x 4")


Iron the short ends down about 1/4 of an inch.


Iron the pieces in half length wise.  Open up the fold and then iron each side to meet at the center line.  Sorry if I am not describing this very well, I'm not sure exactly how to explain it.  You are essentially making a binding.  When finished these 2 steps fold back in half and run your iron over it again to make sure it lines up nice.  Your strap will now be 1/4 of it's original width; your 4 inch piece will now be 1 inch wide.


Take your longest strap and sew up one long end, across the top and down the other side very close to the edge.  Leave the bottom edge unsewn so that you can tuck your other pieces inside.

Now take your medium length strap and do the same thing as the first, the two sides and top.

For the short strap you can either just sew the long sides or you can sew all the way around.  The 2 short ends will be tucked in anyway making a loop for your plastic ring.

Now it's time to sew on the velcro to your two longest pieces.  Take the longest piece (your strap) and sew a 1 inch piece of  velcro at the top end and the other piece(about 2 inches long) ~ 5.75 inches down from the top of your strap.  These 2 pieces will be on the same side. **Due to the differences in strollers you should measure how big you need your loop to be, this will probably fit most but may not fit all.  You could also put this loop around the buckles on the seat too.**


Your medium piece (the cup strap) you will sew a piece of velcro at the top and another longer piece ~ 5.5 inches down from the top.  **Again this should be fine for most cups but you want to check and make sure it fits yours.  These will also be on the same side of the strap.  I originally did them on opposite sides but found the strap comes undone more easily.

**A little tip on sewing on velcro.  When sewing velcro sew one stitch past the velcro then come back to one stitch before the edge (2 stitches basically coming back in line to sew the next side) before turning to do the next edge.  This will help tack down the corners of the velcro so they don't catch on something and pull up.**

Time for assembly.  Take the short piece, place a plastic ring on it and fold in half to make a loop.  Baste in place.  Take the cup strap and place your loop on top of it.  Now take both of these and tuck into the bottom of the main strap.


You will be making a little sandwich and it should look like this (or close).  All thats left is to sew the bottom closed, sewing the other pieces in place.  I would sew over this 2 or 3 times just to be sure it's secure!

The final step is to sew a line just below the ring to sew the loop to the sippy cup strap.  You can cut out this step if you readjust where you put your velcro, they will have to be closer together.

ENJOY!!  You never have to worry about losing cups again.  If you have a child like me who lives to throw things out of the stroller this will be a blessing!

Tuesday, July 20, 2010

Tuesdays Tut

So we will see how regular I stay with this but I have decided to make Tuesdays a day where I provide a tutorial on something I made or a tutorial I want to make.  This week I have an original design to share with you.  Also worth mentioning it's quite hard to get any easier than this project!  Even without a sewing machine you could manage since it's 2 lines about 6 inches long.

So without further adieu here is the

DIAPER CLUTCH:


Materials:

piece of leather or vinyl
velcro or buttons (for closure)
scissors
needle & thread/ sewing machine

Instructions:

Cut out a 10 inch x 14 inch rectangle from your vinyl or leather.


The 10 inch side is the width and is how wide your diaper clutch will be.  Mark down 2 3/4 inches from the top on each side.  You could also take chalk and draw a line across at 2 3/4 inches down from the top.  Sorry it's so hard to see the line but it's right past the sentence.


Now you will fold the material right sides together until the bottom lines up with the line you drew or marks you made.  It will be 2 3/4 inches down from the top.  Sew from the line down on both sides of your clutch.  Clip the bottom corners and turn right side out.


If you want to round the corners of your flap just use the edge of a cup or if you want a scalloped edge like mine I found a spice jar was the perfect size circle, just trace around and adjust until you like it.  Since it's vinyl or leather there is no need to finish or hem edges making it super simple and FAST!  

Your final step is to add a closure.  I added 2 pieces of velcro under the flap.  I chose to glue them because I didn't want to see the seams but you could easily sew them on (and even cover up the seams).  I also was thinking of doing buttons.  That would also be very easy, just sew buttons on where desired then mark on your flap where to make the opening.  Get out that exacto knife and cut a slip through the flap.  Voila!

**I have 3 diapers and a pack of wipes in there but there is plenty of room for more.  Also you could easily stuff some hand sanitizer down into it for a complete diaper changing on the go kit! **

Let your creative side go wild because there really are endless possibilities for this diaper clutch.  For instance you can embellish it with some yo-yo's or handmade flowers, add some beading, really the list is never ending.  You could also tweak the design a bit or the flap, you could make the flap any possible shape:  curve, triangle, scalloped, round, etc.

The best part is, you could easily make yourself, or someone else, one of these in under 20 mins!!


LinkWithin

Related Posts with Thumbnails